Just like how you ask questions to Anthropic Claude in a chat, you can connect Claude AI directly to Airtable and ask hundreds or even thousands of questions (prompts) in bulk and get all their answers back into your base.
The idea is to link your Airtable base with Claude’s API (the AnthropIc API) so you can send a lot of prompts and store the outputs automatically. There are multiple ways to set up this connection – from writing your own script to using no-code tools.
In this post, I will cover several methods to connect Claude AI to Airtable, including:
- Custom scripts (using the Airtable scripting environment)
- Make.com, n8n, or Zapier (visual workflow automation tools)
- Data Fetcher app (an Airtable extension)
- Airtable Automations (built-in Airtable feature)
- Pipedream (cloud integration and scripting platform)
I’ll explain what each method is, how it works in simple steps, and when it’s the best choice.
1. Custom Scripts
This method involves writing your own code (a custom script) to connect Airtable and Claude. You can use Airtable’s scripting extension to write the custom script. Basically, you’ll be calling Claude’s API directly through your code.
Here’s a simple overview of how custom scripts work:
- Get your API keys: You’ll need an API key for Claude (from Anthropic). Keep these safe – they allow your script to access the services.
- Send prompts to Claude: For each record (or in batches), have your script send the prompt text to Claude’s API endpoint. This is usually an HTTP request to Anthropic’s API, including your prompt and API key.
- Get the AI output: Receive Claude’s response from the API (the answer or generated text for each prompt).
- Update Airtable with answers: Take the response and update the corresponding record (e.g. fill in an “AI Output” field with Claude’s answer).
By using Airtable’s scripting extension, you can write JavaScript right inside Airtable to call Claude’s API and update records.
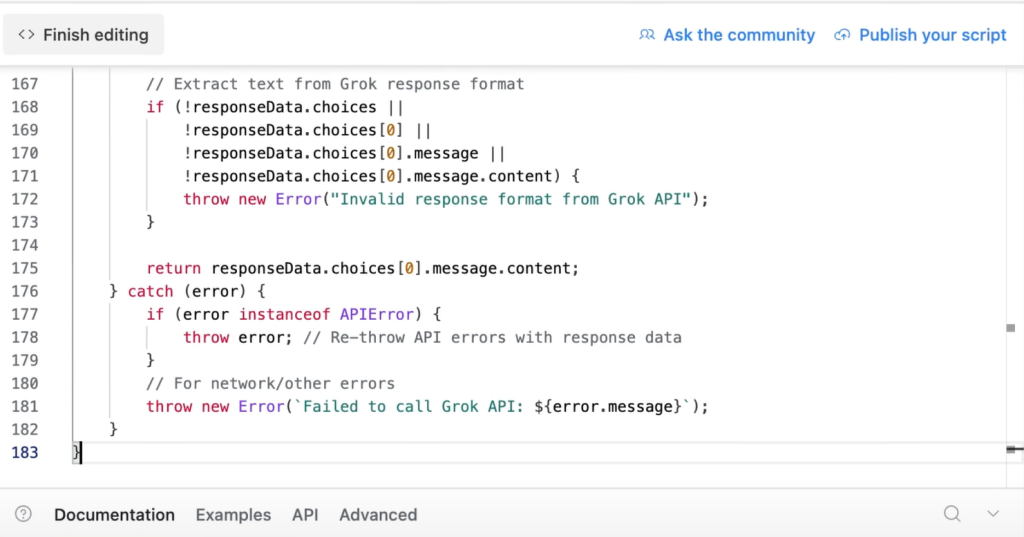
But if you’re not familiar with writing code, you can also use scripts like this, just copy-paste in your scripting extension, and get it working immediately.
Learn more about Multi-AI script
2. Make.com, n8n, or Zapier
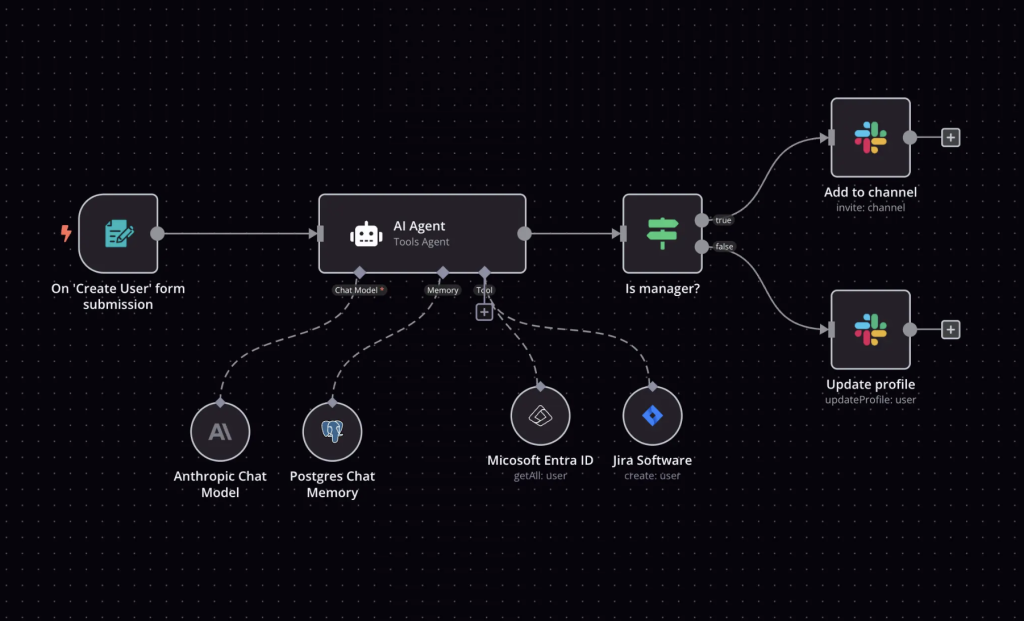
These are no-code/low-code automation tools that let you connect Airtable to Claude AI with drag-and-drop blocks or simple forms. You build a “flow” (in Make.com or n8n) or a “zap” (in Zapier) that moves data between Airtable and Claude’s API without writing full scripts.
Here’s a simple overview of how these automation platforms work:
- Trigger on Airtable: Set the workflow to watch for new or updated records (for example, when a record enters a “Needs AI” view).
- Call Claude’s API: Add a step (or module) that sends the prompt text from Airtable to Claude via an HTTP request. You’ll paste in your Anthropic API key and map the prompt field.
- Write back the response: Take the AI’s reply from Claude and use another Airtable step to update the same record (filling in an “AI Answer” field).
- Turn it on: Test with a sample record, then enable the flow/zap to run automatically whenever your trigger fires.
Make.com, n8n, and Zapier can handle the logic and looping for multiple records. For instance, if multiple Airtable records trigger at once, the workflow can iterate through each.
Explore Make.com, n8n, and Zapier
3. Data Fetcher App
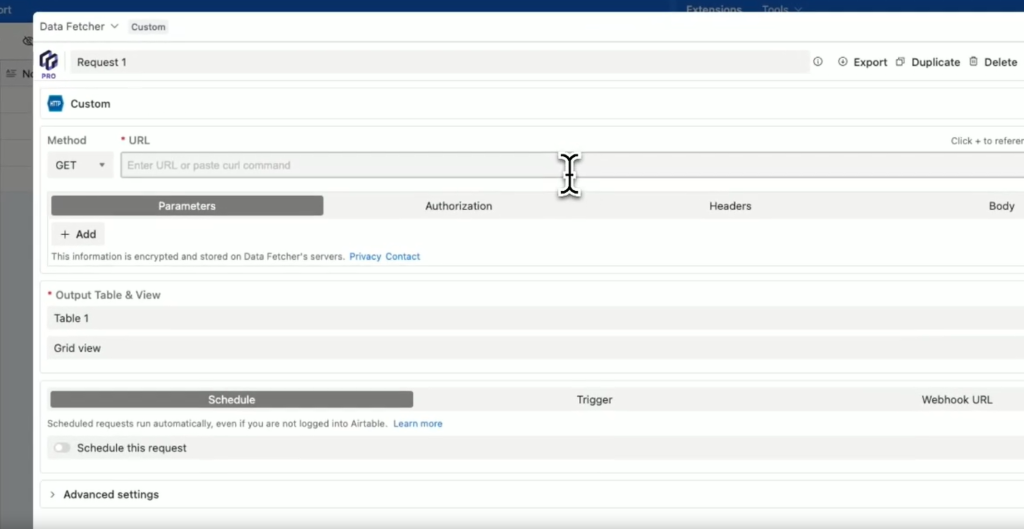
Data Fetcher is an Airtable app that lets you pull in or send out data via APIs without coding. It has pre-built integrations, including one for Anthropic’s Claude API. Essentially, Data Fetcher provides a simple form inside Airtable where you configure an API request and it handles the technical details.
Here’s an overview of how this works:
- Install the Data Fetcher extension: In your Airtable base, go to the apps (extensions) marketplace and install Data Fetcher. It might ask you to create a Data Fetcher account (they have a free plan to start).
- Choose the Anthropic Claude integration: Within the Data Fetcher app, you’ll find a list of ready-made integrations. Select Anthropic (Claude) from the list. This will load a preset configuration for Claude’s API.
- Enter your Claude API key: You’ll be prompted to enter your API key from Anthropic (Claude). This authenticates the requests. Data Fetcher handles storing it securely.
- Configure the request: Map your Airtable fields to the API request. For example, choose the table and field that contains your prompt text, and specify where you want the output to go (maybe another field for the AI’s answer). The app may provide options like setting the prompt, model, or other parameters for Claude.
- Run the request: Click run (or test) and Data Fetcher will send the prompts from your Airtable records to Claude and then populate the responses back into Airtable. You can run this on a schedule or trigger it manually. It can process multiple records (e.g., all records in a view) in one go.
Data Fetcher basically takes care of the API calls for you, so you don’t have to write any code or even leave Airtable.
Learn more about Data Fetcher app
4. Pipedream
Pipedream is a cloud integration platform that’s a bit like a mix of coding and workflow automation. It’s aimed at developers, offering a way to run code (JavaScript, Python, etc.) in the cloud easily, and it has a library of pre-built components for many services.
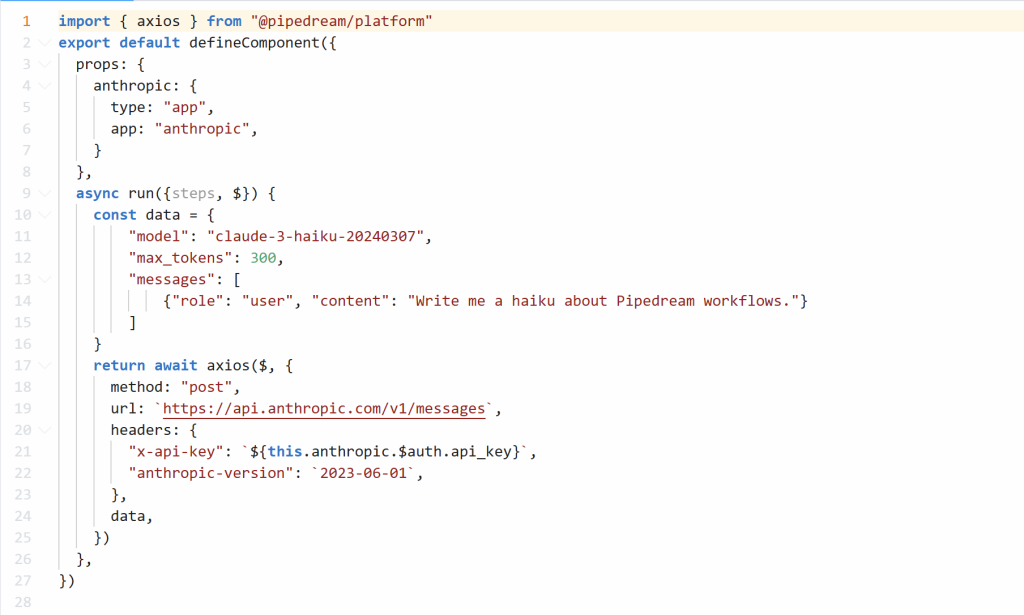
Pipedream has connectors for Airtable and for Anthropic Claude. With Pipedream, you build a workflow that might have a trigger (e.g., an HTTP request, a schedule, or an Airtable event) and then steps that can include code or ready-made actions.
Here’s how Pipedream would work in the scenario:
- Create a workflow with a trigger: On Pipedream’s website, you’d create a new workflow. Choose a trigger source. For example, Pipedream can listen for new Airtable records (they have an Airtable trigger for “New or Modified Record in View” or similar), or you could set it to run on a schedule to batch process records.
- Add steps for Claude and Airtable: Pipedream allows you to add action steps. They might have a pre-built action for “Chat with Claude (Anthropic API)” where you just fill in your prompt and API key (the component takes care of the API call). If not, you can add a code step using Node.js or Python and write a few lines to call Claude’s API.
- Process the response and update Airtable: After getting Claude’s response in a step, you can add another action to update Airtable. Pipedream likely has an Airtable action like “Update Record” where you provide the base, table, record ID, and the field values.
- Test the workflow: Pipedream lets you run the workflow manually with test data. Check that the trigger is working (retrieving the right Airtable records) and that the Claude API returns text and then that text is written back to Airtable.
- Deploy it (turn it on): Once satisfied, you deploy/enable the workflow. It will run whenever triggered (by new records or on schedule, depending on your setup). Pipedream will handle running the code in the cloud for you.
Pipedream is a good option for developers or advanced users who want the flexibility of custom code but don’t want to maintain their own server or infrastructure.
Learn more about Pipedream
Comparison of Methods
Finally, here’s a quick comparison table summarizing which method might be best for you, the typical user type, cost level, and how much setup effort is involved:
| Method | Best For (User Type) | Cost | Setup Effort |
| Custom Scripts | Developers or those who can code; full control over logic. | Free (do it yourself, just API usage costs) | High – you write and maintain all the code. |
| Make.com, n8n, or Zapier | No-code/low-code users who want a visual workflow; tech-savvy non-coders. | Freemium (Make has free tier; n8n is free if self-host) | Medium – configure a workflow with modules, but no coding. |
| Data Fetcher App | Non-technical Airtable users who want an easy in-Airtable solution. | Freemium (free for small use, paid for more features/runs) | Low – very easy, guided setup within Airtable. |
| Pipedream | Developers or advanced users who want cloud-hosted code and integrations. | Free tier (generous for developers; pay-as-you-go beyond that) | Medium – some coding or configuration needed, but easier than building from scratch. |
If you want the easiest and cost effective option, I would suggest getting the Multi-AI Airtable script, but you can also go with n8n, Make.com, or Zapier if you consider yourself tech-savvy.